


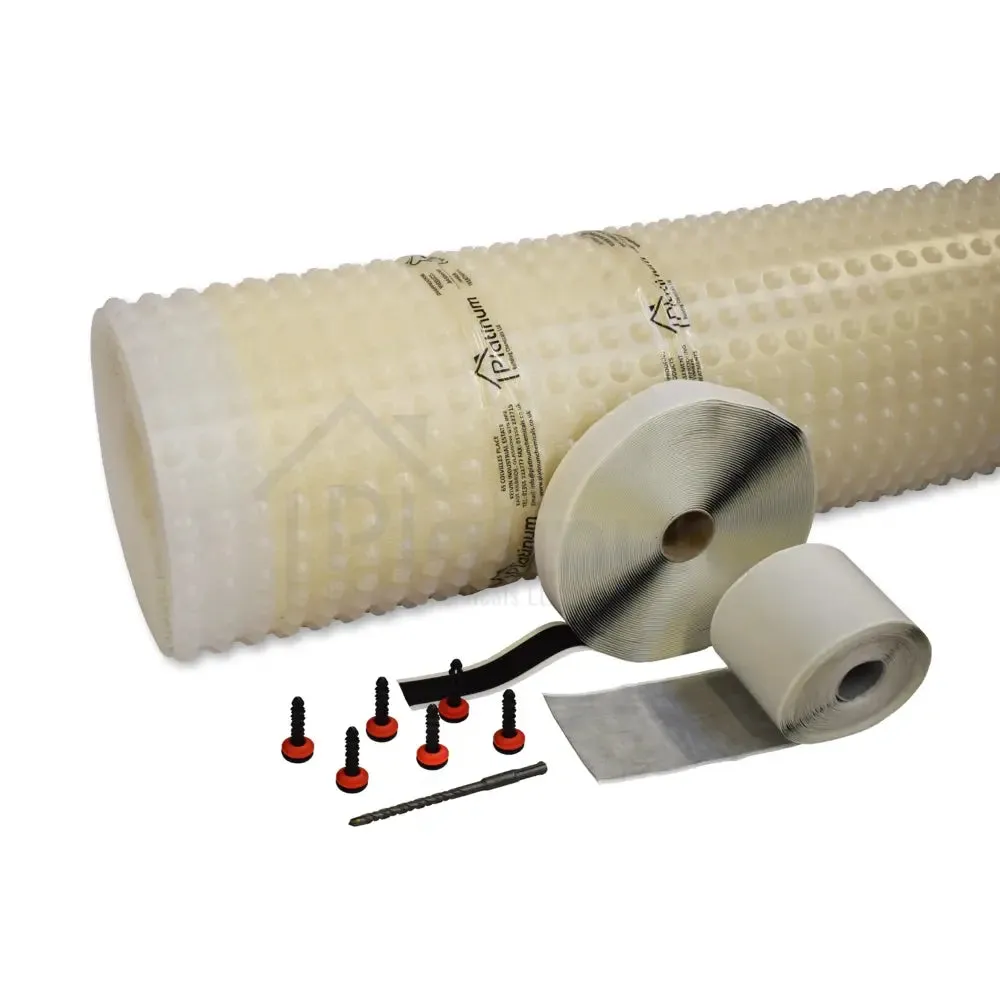
A high quality Basement Waterproofing MESHED Membrane Kit using , supplied with a roll , a roll of , and the recommended number of for fixing.
Each kit size is also supplied with a high quality .
Note: This particular kit is recommended for use in below ground structures (i.e Basements), hence the use of the 'heavier-duty' for fixing. If this membrane is for use above ground level, the Wykamol CM8-MESH Tanking Membrane Kit (With Plaster Plugs) should be used instead.
The Wykamol CM8 MESH Waterproof Membrane Kit can be purchased in 20M² or 40M² sizes, use the drop-down box option below to choose your preferred kit size.
A full table of each Waterproof Membrane Kit Contents is shown below in the 'Description' Tab.
Wykamol CM8 MESH Waterproof Membrane is supported by BBA Certification Certificate Number 18/5595.
Description
Wykamol CM8 MESH Cavity Drain Membrane Kit (With CM Brick Plugs)
Wykamol CM8 MESH Membrane is a high quality Cavity Drain Waterproofing Membrane comprising of high density polyethylene membrane with a strong HDPE mesh heat-welded during the manufacturing process to the surface of one side.
The meshed surface creates a mechanical key to allow the membrane to be plastered, rendered or to receive dot & dab plasterboard.
Wykamol CM8 MESH Membrane is suitable for the waterproofing of earth retained walls and vaulted soffits below ground level (i.e Basements) delivering a grade 3 environment to BS8102:2009 and NHBC Chapter 5.4.
Wykamol CM8 MESH Membrane is inert and, therefore, non-polluting to drinking water, highly resistant to water, alkalines, saline solutions and organic acids, and not affected by minerals and hydrocarbons. It is also rot-proof, and resistant to bacteria, fungi and other small organisms.
Kit Contents:
| Wykamol CM8 MESH Waterproof Membrane Kit | |||||
|---|---|---|---|---|---|
| Kit Size | Membrane Roll Size | No. of Fixings | No. of Waterseal Tape | No. of Mesh Tape | No. of SDS Drill Bits |
| 20M² Kit | (W) 2.0M x (L) 10M | 320 x | 1 x Roll of | 1 x Roll of | 1 x |
| 40M² Kit | (W) 2.0M x (L) 20M | 650 x | 1 x Roll of | 1 x Roll of | 2 x |
Benefits & Features:
-
BBA Approved
-
Extremely Robust Membrane with High Performance Bonded Mesh
-
For use in Below Ground Applications (Basements etc.)
-
Part of a Type C Cavity Drain Membrane System in Line With BS8102:2009 when applying Below Ground.
-
Waterproof, Salt Inhibiting, Root and Contaminate Resistant
-
Creates a Dry, Habitable Living Space in Areas Previously Suffering From Damp / Wet Conditions
-
Easily Cut Down Using a Sharp Blade
-
Easy to Fold Around Windows and Doors
-
Quick to Install - Minimal Preparation Needed to Wall Surfaces
-
No Drying Out Process - Redecoration Can Occur Immediately
-
Little or No Damage to the Existing Structure
Associated Products:
-
: The recommended Fixing used to fix the Membrane to the substrate (Included In Kit).
-
: A Sealing / Jointing Tape made of a butyl rubber compound with a polypropylene fleece finish. The 'Fleece' surface provides a 'key' for direct plastering and rendering over (Included In Kit).
-
: Provides a double-sided waterproof seal when joining Membranes along the studded flange where they overlap (Included In Kit).
-
: Used to form a seal around the neck of the Fixing Plug if not using Sealing Washers. Can also be used to patch up any punctures in the membrane.
-
: Used for the control of primary and secondary efflorescence in concrete mixes. Should be applied to concrete surfaces in basements prior to the installation of a 'Type C' Cavity Drain Membrane System to prevent the ‘leaching’ of free lime from the concrete.
-
: A PVC Drainage Channel System which should be fitted around the periphery of an internal floor at the vulnerable wall / floor junctions in Basements. Any water entering the building through walls or curved soffits is controlled behind the membrane and enters the channel through before being diverted to a Mechanical (Sump and Pump System) or Natural drainage point.
-
: Complete water control systems principally designed for use in below ground structures (basements) to control water ingress.
Technical Data:
| Material | High Density Polyethylene (HDPE) |
| Unit Weight | 0.505kg/m² |
| Sheet Thickness | 0.6mm |
| Stud Height | 7mm |
| Colour | Clear |
| Water Tightness - 60 kPa; 24h (EN 1928) | Pass |
| Working Temperature | -50°C to 80°C |
| Softening Temperature | 126°C |
| Tensile Strength MD (BS 12311-2) | 416 N |
| Tensile Strength CD (BS 12311-2) | 488 N |
| Resistance to Static Loading (BS 12730) | >20 Kg |
| Compressive Strength (BS EN ISO 25619-2) | 180 kN |
| Reaction to Fire (BS EN 13501-1 :2007 A1:2009) | Class F |
| Type of Application | Type V |
| Life Expectancy | Lifetime of Structure |
Installation
Preparation:
Unsound plaster, render or screed should be removed and surfaces made level. This can be achieved using , or a 3:1 sand:cement mix incorporating .
Leave all new works to dry thoroughly before any membranes are fixed.
In case of walls suffering from mould or masonry fungi, prior to fixing the membrane, remove surface contamination by brushing, then apply a in line with the relevant Technical Data Sheet
If Dry Rot (Serpula Lacrymans) is present in the walls, this will require detailed assessment before proceeding.
We recommend an application of to the concrete walls, before an application of CM8 MESH, to prevent lime efflorescence and dusting, which can block .
Application on Walls:
Wykamol CM8 MESH Membrane is fixed with the studs against the wall to create an air / depressurisation gap.
The membrane can be fixed either vertically or horizontally. However as this product is not available in 2.4M height and also due to the heavy weight of the material, most fixing of Wykamol CM8 MESH Membrane will be Vertical.
When making this decision, you will need to take into account the size of the area to be lined, and the height of the walls relative to the width of the membrane.
Horizontal Fixing requires less cuts and jointing but the full roll is very heavy at first. Vertical fixing has much lighter strips to fix, but requires that each of these is taped back together again. You may find that vertical fixing is easier, but requires more for jointing.
The membrane is fixed to the wall using the .
Place the membrane in position as level as you can judge by eye. Using the correct size of SDS Drill Bit required for the fixing, drill through the centre of a stud near the top and edge to a depth greater than the fixing.
The fixing is then hammered into the pre-drilled hole until the plug sits flush in the stud. The rubber washer on the fixings re-seals the hole. Level the membrane using the spirit level or laser level if used, and fix another plug about 2 metres along at the top of the sheet. The membrane will now be hanging level to the wall.
If you are fixing horizontally, continue fixing every 2 metres until you have reached the end of the roll or you have covered all of the wall(s) to be treated. It is very important to regularly check the level. If the membrane is not level, you may well find that the membrane is kinked and looks unsightly, it will also dive down when fitted around corners.
If you are fixing Vertically, hang each subsequent sheet by the two fixings as described above. The subsequent sheet is joined by overlapping the edge of one sheet by another underneath by a minimum of 2 studs. Fix Brick Plugs & Seals through the studs as close as possible to the edge of the membrane.
Apply along the joint with equal overlaps of the tape onto each sheet of membrane and press firmly into place.
Apply more pressure with the palm of your hand to further seal the whole of the joint. A Hot Air Gun should be used to help sealing, especially in cold or damp conditions.
Fixing Centres:
Fix in a square at 350mm centres, and then fix a plug in the centre of four fixings so it looks like a 5 on a dice.
All fixings will then be a maximum of 250mm centres.
On very flat walls, the horizontal and vertical centres can be moved out to 400mm so when the centre plug is fixed, the centres are not more than 300mm.
Finishing
Wykamol CM8 MESH Membrane can be plastered or rendered, or can be plasterboarded using a dab fix.
Plasters:
The recommended plaster to be applied to Wykamol CM8 MESH Membrane is Tarmac Whitewall which should be in two coats when applied to Wykamol Mesh Membranes.
The plasters can accept a finishing 3mm skim coat to finish.
Note: Manufacturers recommended drying times may vary according to atmospheric conditions.
Cement Based Renders:
For internal cement renders the mix should be six parts clean sharp sand / one part lime / one part cement. A two-coat application is recommended allowing 7-10 days between coats.
Drying time is important because shrinkage cracks may appear.
A weaker mix of seven or even eight parts sand can be used for the second coat.
Hydraulic Lime Based Mortars:
First Coat
Using a ratio of 1 part Lime to 2½ - 3 parts sharp washed sand with evenly distributed hair throughout the mortar and working to a layer of 10mm thick, push the plaster into and across the pre-wet laths at a 45 degree angle to the lathes.
The plaster should be correctly cured until hard
Second Coat
The second coat also known as the intermediate or float coat will be applied similar to the first coat only without any hair being added to the mortar.
You must ensure you wet down the first coat with a fine mist before spreading a 7mm coat, before scratching up and leaving in preparation of the finish coat.
Finish Coat
For the final top coat a fine mix of 1 part lime putty to 2 parts well graded super fine sand. Remembering to wet down the surface before application with a fine mist spray.
Allow time for the water to absorb into the plaster then apply a coat of approximately 5mm, then rule off and leave for a couple of hours.
When ready, rub up the finish coat using a plastic or wooden trowel to bring back the fat until the required finish has been reached in the case of any light crazing this can be rubbed up and trowelled out.
General Plastering & Rendering Considerations:
Note: All plasters and renders etc. must be to a minimum total depth of 15mm.
The undercoat should be applied with firm pressure to ensure the product is fully pushed behind the mesh so that the studs are fully filled, and to an approximate thickness of 5mm and be well scratched with a wire scratcher.
When the scratch coat has set, the floating coat should be applied to a depth of 7mm and lightly scratched to provide a firm key for the final coat, which should be to a minimum thickness of 3mm.
All plasters and renders should be applied strictly in accordance with the manufacturer’s instructions, and good plastering / rendering practice as described in BS5492 and BS5262 Code of Practice.
Do not apply decoration until the plaster or render is thoroughly dry.
If any special renders or plasters are to be considered, technical advice must be sought from the Company’s technical department.
Curing:
Note: Cement and Lime based mortars require curing. Curing is the process of keeping a mortar or render under a specific environmental condition until the chemical set (referred to as hydration) is sufficient to withstand the environment into which the mortar has been placed.
Lime binders are generally weaker than cements taking longer to acquire their strength and hardness, leaving them potentially more vulnerable for a longer period than cement equivalents, and curing them once placed is simply regarded as best practice.
Good curing is typically considered to be that of providing a humid environment stimulating full hydration of the lime or cement binders, providing strength development along with other benefits, especially the ability to withstand hairline cracking.
The most common cause of failure is allowing a mortar / render to dry out too quickly, impeding the chemical process for hydration, stressing the mortar resulting in cracking.
Standard practice for protecting cement or lime based renders/mortars is with wet / dampened hessian sheeting draped over the area in relatively close proximity to the render. This should be left in place for at least a week and is a standard requirement that is required in all cases.
During the warmer months, the hessian will need to be repeatedly wetted and/or covered with plastic sheeting to ensure the correct curing environment.
Curing should be of at least 7 days.
Dry Lining:
Wykamol CM8 MESH Membrane can be effectively used in conjunction with dry lining by dab fixing the plasterboard using a proprietary dabbing compound.
Be careful when installing laminated or insulated plasterboard, as when they are dot & dabbed to Wykamol Meshed membranes, building regulations require two mechanical fixes to each laminated board. These fixings may breach the membrane which cannot be repaired.
Where insulation is required to the wall build, we recommend to use a NON-MESHED Membrane (such as ) and use an independent dry-lining frame.
House the insulation within the frame and plasterboard over.
")


